Change Username in AD and O365
Read to know how you can change username in AD and O365 without having to delete the profile of the user.
- Connect to your DC Server using Admin credential
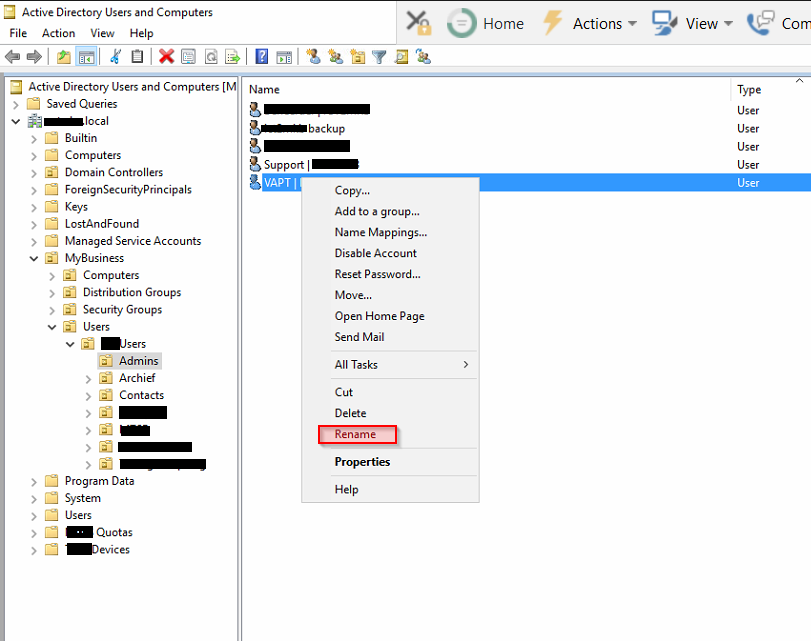
- Then, open AD Users and Computers and select that user needs to be updated name
- Right-click and rename

- Set the Full name old username to new username and add appropriate Full name, First, Last and Display name (new username)
- Make sure the Mail attribute is with a new username by checking in user properties

- Open Elevated Windows PowerShell in DC Server and run sync command to sync newly added username to O365 by using this command: “Start-ADSyncSyncCycle -policyType Delta”

- Go to the O365 admin portal using the Admin credential and check the name. You may see the old username but with a new Display name.
- Now, connect to DC again and open Elevated Windows PowerShell to sync the same name as the display name in O365 like AD.
Use this command: Connect-Msolservice and enter Admin credential and then
run 2nd command: Set-MsolUserPrincipalName -UserPrincipalName oldname@test.onmicrosoft.com -NewUserPrincipalName newname@test.onmicrosoft.com - Go to O365 and check and it must be showing a new name.
- Connect user PC/Machine with the new username.
- Open Elevated Command Prompt and run whoami in Command Prompt. You might see an old username as a profile path.
- Then, login with Admin user in same PC/Machine and go-to C:Users and rename old username with new username.
- Open Elevated Command Prompt and run this command to sync “gpupdate /force” and sign out

- Login with a new user account, we can see that this user logged in with a new user but in c:userstemp profile.
- Now, open Regedit in user machine and go to path HKEY_LOCAL_MACHINESOFTWAREMicrosoftWindows NTCurrentVersionProfileList and check for profile image path C:UsersTemp and rename it with “.temp” instead of “Temp” at the last in the profile list


- Remove “.back” from the Profile image path C:usersold username to change it with C:Usersnewuser name.
- Login with a new username on PC/Machine and check the user profile path by opening CMD. it should be like C:Usersnewuser profile path.
- At last, check any shared drive/network drive path or any path linked (like Roaming Profile etc) from DC. This is to make sure all data appear correctly to the new user profile in the new user PC/Machine.
Upcoming:
We keep uploading new blogs every week on our website- keep an eye out for those.
Lastly, if you need help with more such IT Solutions, feel free to Contact Today!. We’ll be happy to resolve your queries.


