If you are switching over to Office 365 you’d probably want your old emails with you. So to get your mail into Office 365, we can import a PST file. While small mailboxes can be done in Outlook self, for large mailboxes you might need to use import tools like Azure AzCopy. To guide you with the same, we have written an article that will guide you on how to import PST files into Office 365
To import PST files to user mailboxes, you first have to assign the “Mailbox Import Export” role. By default, this role isn’t assigned to any role group. Using the admin portal or PowerShell, you can add the Mailbox Import Export role to the Organization Management role group.
After the role is assigned, follow the below steps:
Step 1: Copy the SAS URL and download Az Copy
- Go to https://compliance.microsoft.com/ and sign in using the credentials for an administrator account in your organization.
- In the left panel of the compliance portal, click on Data lifecycle management > Import.
- On the Import tab, click
 New import job.
 - Enter the name for the PST import job, and then click Next.
- On, the next page, select the option “Upload your data” and click Next.

- Next, on the Import data page, do the following two things:
Point A: Copy the SAS URL to upload data.Point B: Link to download AZ copy application.
Point B: Link to download AZ copy application.

Step 2: Upload your PST files to Microsoft 365
- Open the command prompt on your local computer and navigate to the location of your PST file.
- Go to the directory where you have downloaded the azcopy.exe file using CMD.
- Run the following command to upload the PST files to Microsoft 365.
azcopy.exe copy “<Source location of PST files>” “<SAS URL>”
[In my case] Source: “D:Latest Curracon exportedCate_Export 5.24.2022-1625PMExchangecate@NETORGFT7288870.onmicrosoft.com-2.pst”
SAS URL: “https://f1846ad2d3fd4cccb676219.blob.core.windows.net/ingestiondata?sv=2015-04-05&sr=c&si=IngestionSasForAzCopy202205201256189886&sig=AOVSDt%2BpZ%2FSHWktMSIrpLpRJ13GaV35TPqV8ziC8FzI%3D&se=2022-07-23T14%3A40%3A47Z”
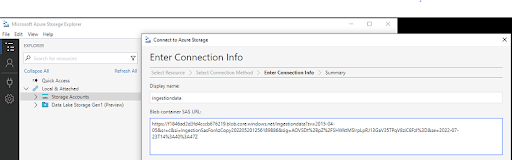
Step 3: Azure storage Explorer to connect Azure storage.
- Download and install the Microsoft Azure Storage Explorer tool.
- Start the Microsoft Azure Storage Explorer and On the Select Resource page in the connect to Azure Storage dialog, click Blob container.
In the left side panel, click on the third “Connect” icon. Then select Blog Container. Click Next.
Then select the option “Shared Access Signature URL(SAS)”. Click Next.
Enter the Display Name and SAS URL. Click Next.
- On the Select page, you can select the SAS tab and enter SAS URL in the following tab.
- The ingestion data container is opened which contains the PST files that you uploaded in Step 2.
- When you’re finished using Storage Explorer, right-click ingestion data and then click “Detach” to disconnect from Azure storage.
Step 4: Create the PST Import mapping file
- Download the CSV file from the following link https://go.microsoft.com/fwlink/p/?LinkId=544717 and fill up the required details like Workload, Name [PST file name], Mailbox, In Archive, and Target Root Folder.
- After that, you need to upload this file on the Import data page [Step 1]. Once it’s uploaded you need to validate it and save the job.
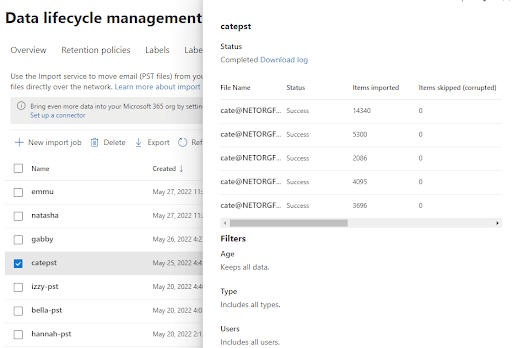
- Click refresh to update the status information displayed in the Status column. When the analysis is complete and the data is ready to be imported, the status will change to Analysis completed.
Step 5: Filter data and start the SY Import Job
- On the Import tab in the compliance portal, Select the import jobs that you created in the above step and click Import to Microsoft 365.
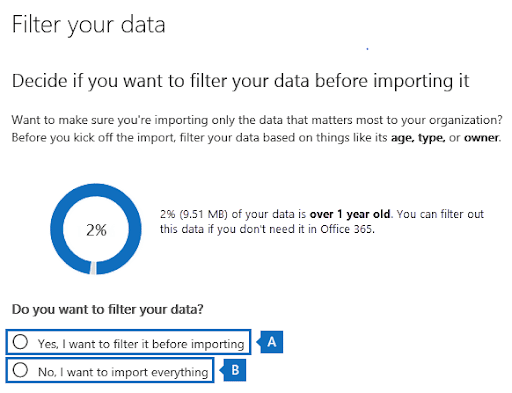
- Filter your data according to your requirement and complete this step.
- Once your data is successfully imported, you can verify the status from the compliance portal.