Microsoft Teams has come up with some interesting new features that will just UP the Meetings game. We had covered a similar topic months ago, where we had talked about 8 Microsoft Teams Features you were unaware of or that you need to use. That blog was focused on general features. This one is only focused on features you need to know before you join Microsoft Teams Meeting in 2022. Features that are new and will be highly useful when you’re presenting via Teams.
We are damn sure and positive that these are only going to be more and more useful to you.
Before you Join Microsoft Teams Meeting – Noise Suppression
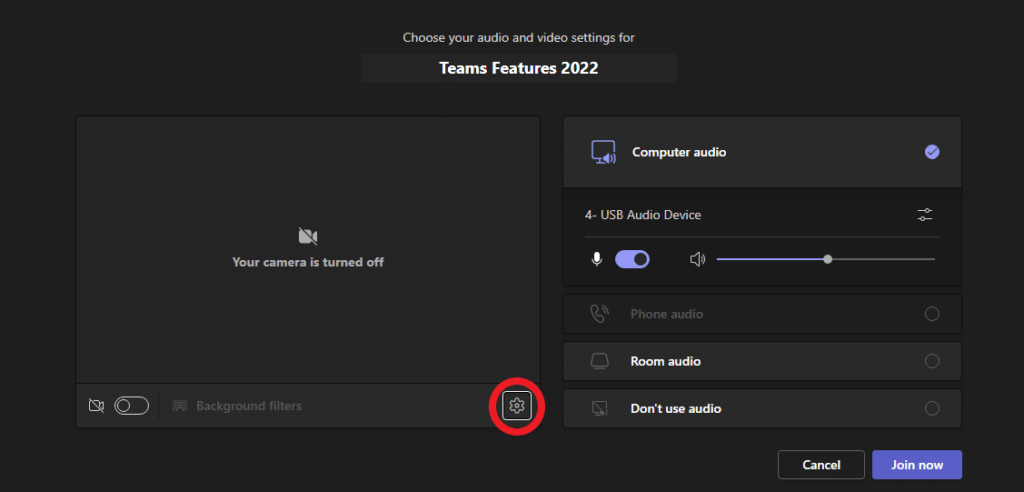
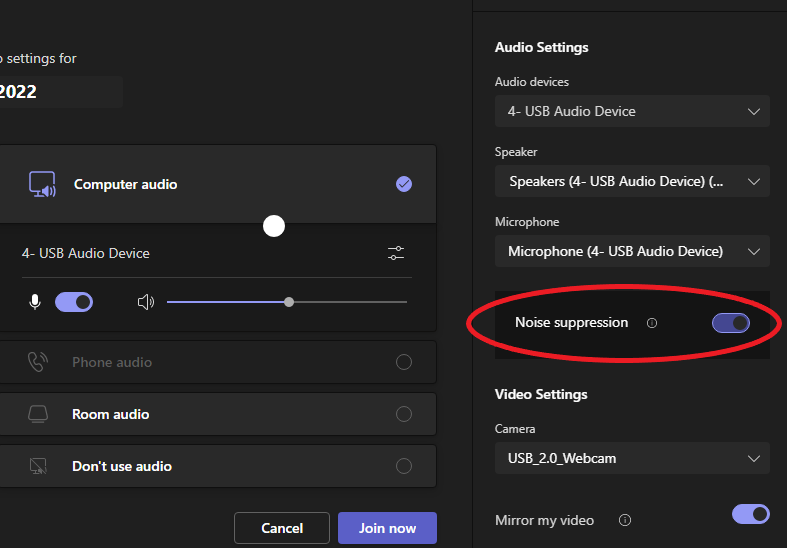
Right before you start a meeting, you can click on the gear icon (above) and a pop up will open up on the right hand side (as shown below)
You can enable or disable Noise Suppression from here.
For that, you need to go to:
But how to set the level of Noise Suppression level. Do you want it to be highly suppressed or low?
On your Teams App, click on the 3 dots (ellipses) on the top right side of the top bar> Click on Settings>Devices>Noise Suppression.
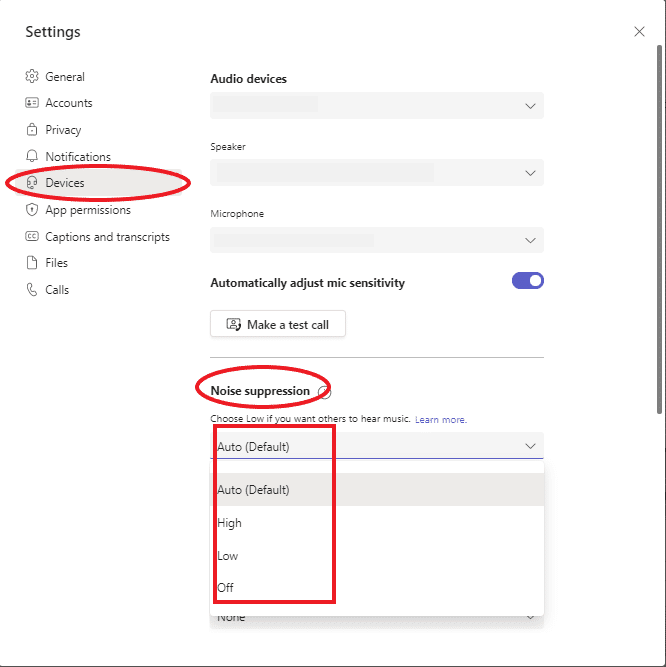
As seen above, you can now adjust the amount of background noise suppression you want to have. The Suppressor will only detect human voices and eliminate all possible noises.
Play around with the levels of suppression to see for yourself on what works best for you.
Display your video over the content screen
Ever seen those gaming videos where the person is playing a video game and you can see it on the main screen but you can also see the gamer on a mini screen within the rectangular gaming window itself?
Well, that’s now possible on Teams as well.
Not just that, you have 4 types of presenter modes available now.
During a Teams Meeting, click on the Share Screen button, then you’ll see the following options on the box that opens up…
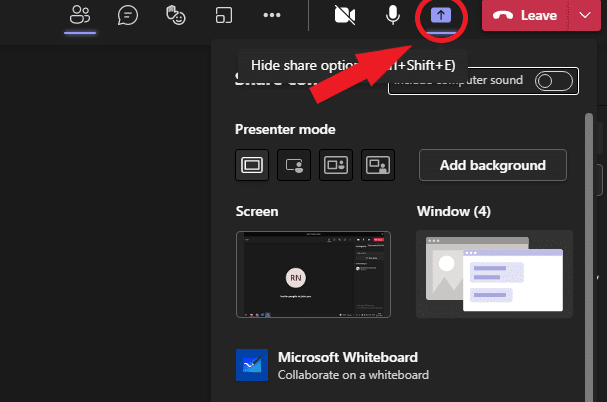
As seen below,
You have 4 options like Content Only, Standout, Side-by-Side and Reporter.
In the Standout View, your entire background would disappear and only you’ll be visible on top of the Window that your sharing.
In the Side-by-Side Format, the viewers will be able to see the content on the left side and you on the right side.
In the Reporter Layout, your video and the content would be displayed diagonally.

Answer Questions in the order they are asked
Earlier during a teams Meeting, if 10 people raised a hand to ask a question, it’s difficult to remember who asked first, all you can do is randomly answer questions.
But now, Teams has a new feature where if Person A has asked a question first and Person B was the second one to ask, the numbering would be shown beside their hand.
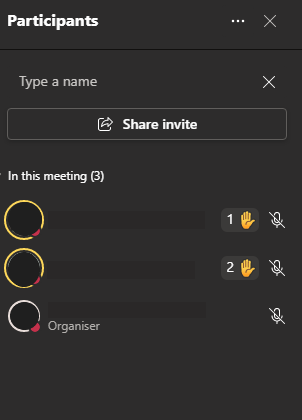
Now isn’t that convenient? If you want to know about more Microsoft Teams Features that will help you ease collaborations in 2022, read this blog.
Whiteboard
As you click on the Share Screen Button during a Teams Call, you’d see that there is now an option of Microsoft Whiteboard.
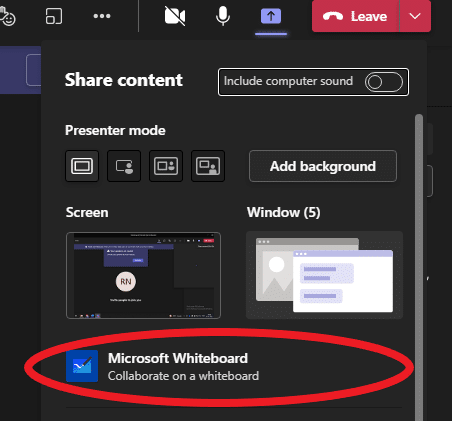
Once you click on that, a screen like the one below will open.
On the left pane, you’ll see options like Notes, Text, Images, Reactions, Shape, Templates and Documents.
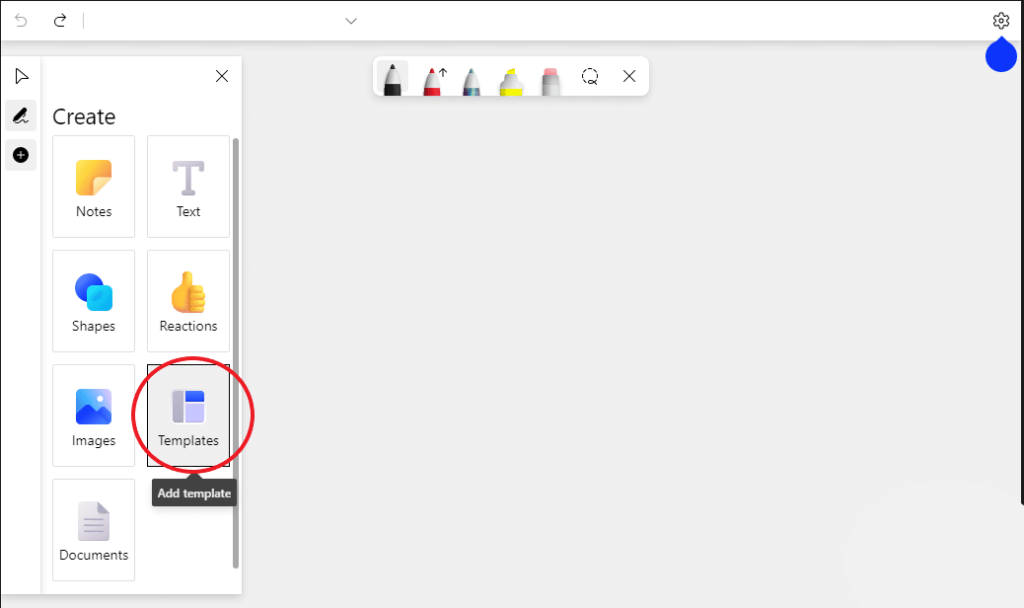
You can explore and use all of these to collaborate the way you would, in-person.
If you click on Template, you’ll see a bunch of categories like:
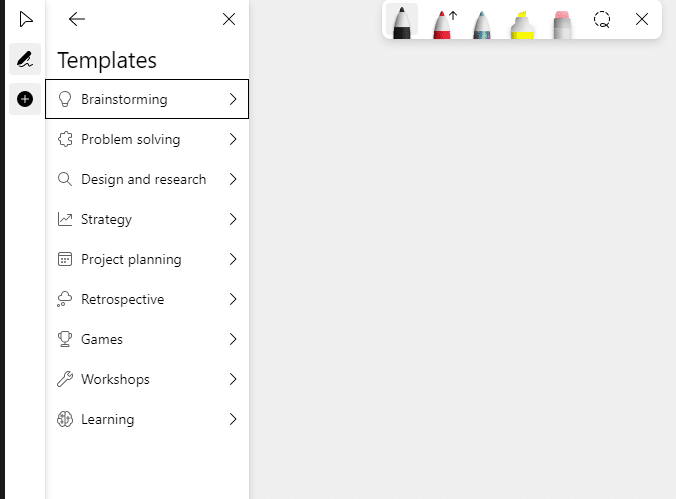
Explore it for yourself, but as you can see, you’ll find options like the ones shown below:

Aren’t these awesome?
You can also right texts, highlight texts, underline texts and even point at texts.
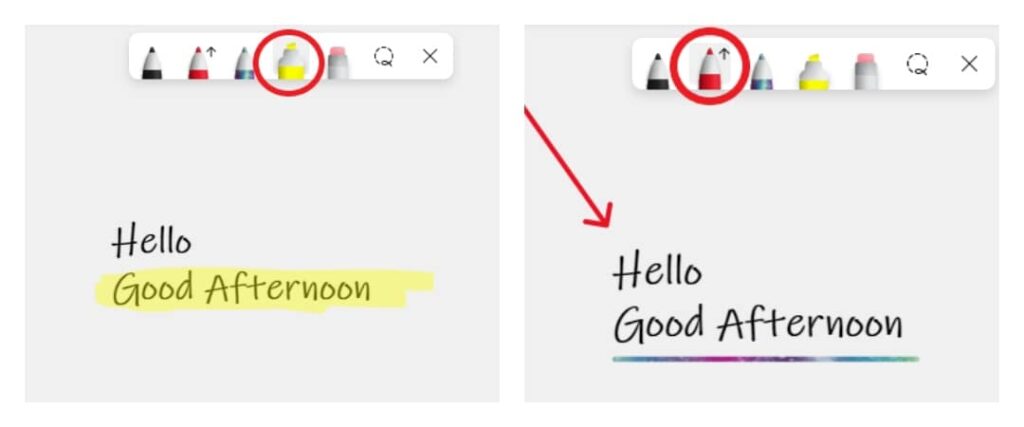
If you want the lines you draw or scribble to be straight, just hold the Shift Button down.
Just try these out and explore for yourself.
All in all, we think it is one awesome feature to have to enhance team collaborations and even play games virtually.
Turn on Live captions
Whaaaaat?!?!
Yes, just like there are Auto-generated captions in Youtube videos, now you get the same feature in a Teams Meeting as well.
Let’s say for example, you are in a Teams Meeting and you are finding it hard to understand the English that somebody else is speaking; turn on Live Captions.
How can you turn this feature ON? Go to the ellipses (the three dots) on the bar above. As the menu pops up, you can see the option of “Turn on live captions” in the list below.
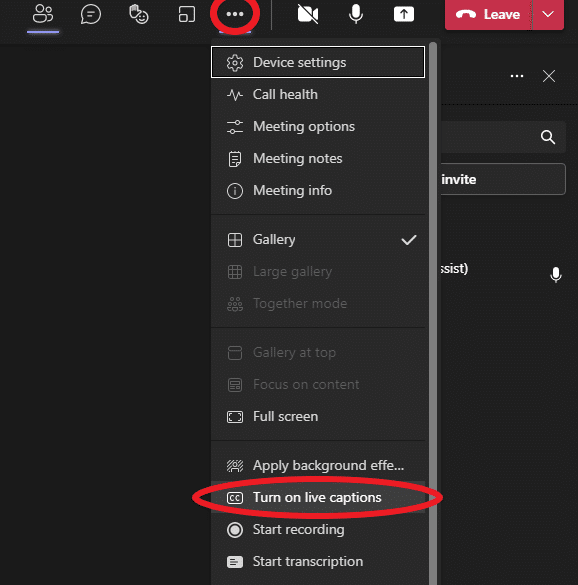
As you click on it, the feature will be enabled and as the person speaks, you will see the text appear below the main screen.
You can even turn it off if you do not feel the necessity to have it.
Turning off Computer Audio
Let’s say you have shared your screen and you are playing a video.
For the audience to be able to hear the audio that is being played, you will have to have “Computer Audio” enabled.
You can enable and disable it before you enter the meeting, and you can also do the same when you are within the call as well.
Go to the Share Screen option, you’ll see that there is an option of “Include Computer Audio” in it. You can enable or disable it.
And there’s also a third way of doing it instantly.
Once you have started sharing your screen, you need not always go to the Main Share Screen option.

The Share Screen Tool bar that appears on top, lets you switch presenter modes as well as enable or disable the computer audio.

Disable Camera and Mic for all attendees
This feature could be useful for many, especially Teachers.
It may seem like a tricky situation first, like it did to us too.
While our team was testing this out, inspite of the Organizer turning the “Mute All” option ON, participants were still able to unmute themselves.
But the catch here is, as the option says “Mute all Attendees”. What you have in your list initially are not attendees, they were “Participants”. So first, you need to turn all participants into Attendees.
How can you do that?
Click on the ellipses beside the participant that you want to make an attendee. Click on the “Make an Attendee” option.
Once you have done that,
As you click on the “Show Participants” option and click on the three dot ellipses, you can see that you can now Disable and Enable Camera and Mic for all attendees at once.
Here‘s how you can change participant settings in a Teams meeting.
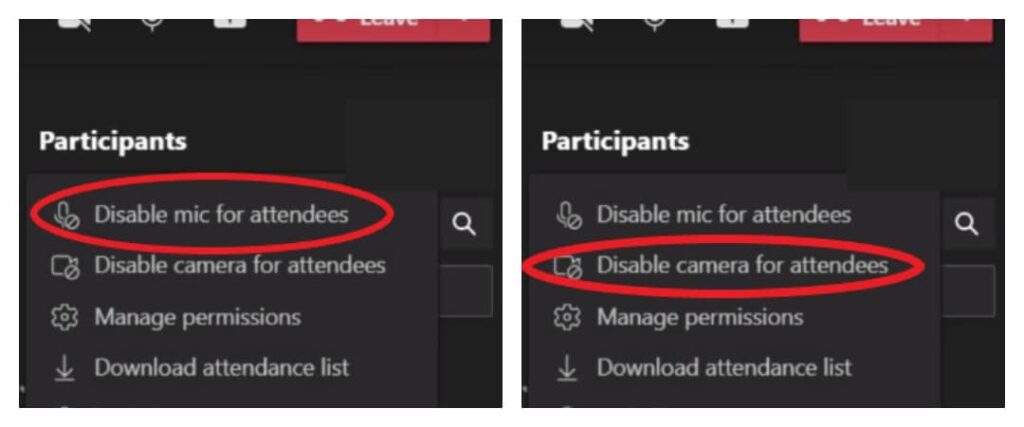
They will not be able to enable it back until the organizer clicks on the “Allow Mic” “Allow Camera” option for specific people.
Multi-Spotlight feature
A feature that was launched way back in Oct 2020, has now been polished. Now the Teams Meeting Organizer can spotlight multiple people at once.
During the Teams Meeting, just click on the ellipses on the person you want to highlight.

Frequently Asked Questions
How to create a team in Microsoft Teams?
Creating a Team in Microsoft Teams gives you the ability to chat and share files and documents with a specific set of people.u003cbru003eTo create a team, Open Microsoft Teams u003e Teams (on the left pane) u003eJoin or create a Team (bottom left side)u003cbru003e
How to change the background in Microsoft Teams?
u003cstrongu003eYou can do this in 2 waysu003c/strongu003e:u003cbru003e1) Before getting into a meeting, ensure you have turned your camera on and then you’ll see the option of u0022Background Filtersu0022 beside it. Once you click on it, you’ll see a bunch of options within it.u003cbru003e2) Change the background in Teams when the meeting is going on – for that, click the ellipses (3 dots) on the top bar, choose the u0022Apply background effectsu0022 option in the list and choose from the backgrounds available.u003cbru003e
How to set up a Microsoft Teams Meeting?
To set up a Teams Meeting, Open Microsoft Teams u003e Calendar (on the left pane) u003e Meet Now/New Meeting (depending on your need). If you click on u0022New Meetingu0022, you’ll have the option to add title, add attendees, set the date and time and write a little description regarding the meeting.u003cbru003eOr you can simply click anywhere on the calendar and you’ll still be able to start a meeting.
How to join a Microsoft Teams Meeting?
When you have accepted a Teams Meeting invite, it gets added to your calendar. So, you need to go to the calendar option on the left side pane and look for the scheduled meeting. Besides that, you’ll see a u0022Joinu0022 option. Click on that and you’ll be able to join the Meeting.
How to record a Microsoft Teams meeting?
Once the meeting has begun, you can start recording it by going to the ellipses on the top bar and there you’ll find the option of u0022Start Recordingu0022. Once you click on that, everyone present in the Teams Meeting will be notified saying that the u0022Meeting is being recordedu0022.
Conclusion
Microsoft has made such good use of the lockdown period that Microsoft Teams has become an inextricable part of our professional lives. You use Teams on a daily basis, but do you use it solely to communicate or arrange meetings when they can be used for so much more? Read this blog to learn about some underutilised Microsoft Teams features which will help your team ease collaboration and work more efficiently.
